
Using Sysprep Instead of QuickPrep with VMware View Desktop Pools

Sometimes you need Sysprep instead of QuickPrep when creating a VMware View linked-clone desktop pool, usually because legacy software requires a unique local security identifier (SID) on every desktop. I was recently asked about it because an older antivirus product needed unique SIDs to centrally manage its in-OS agents.

The two customization methods are compared in the View Administration Guide (pages 95–96), and VMware KB 2003797 sums up the differences:

QuickPrep vs. Sysprep

FunctionQuickPrepSysprep
Removing local accountsNoYes
Changing Security Identifiers (SID)NoYes
Removing parent from domainNoYes
Changing computer nameYesYes
Joining the new instance to the domainYesYes
Generating new SIDNoYes
Language, regional settings, date, and time customizationNoYes
Number of reboots01 (seal & mini-setup)
Requires configuration file and SysprepNoYes

High-Level Steps

  1. Copy the Sysprep files to the vCenter Server. This is only needed for Windows XP; Windows 7 includes Sysprep. Details are in VMware KB 1005593.
  2. Create a guest customization specification in vCenter.
  3. Add a desktop pool that uses Sysprep with that customization specification.

Create a Guest Customization Specification

In vCenter, open Home → Customization Specification Manager, click New, and enter a name on the Properties page. Do not use a custom Sysprep answer file.

Customization specification Properties page in vCenter

Continue to the Computer Name page and set it to use the virtual machine name. Then enter your license key, administrator password, time zone, and so on until you reach the Network page.

Leave the network at the default Typical settings so the desktops use DHCP.

Network page set to typical settings (DHCP)

Leave the Workgroup or Domain page at its default. Anything entered here is ignored; the VM joins the domain using the guest customization settings in the View pool instead.

Workgroup or Domain page left at default

On the final Operating System Options page, make sure Generate New Security ID (SID) is checked. Unique SIDs are the whole reason we’re using Sysprep. Then finish the wizard.
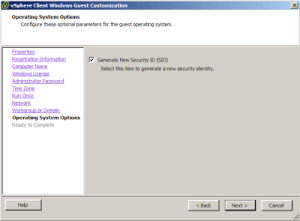
Generate New Security ID (SID) option checked

Add the Desktop Pool

In View Manager, add a desktop pool as usual. The only difference from QuickPrep is on the final Guest Customization page:

  • Select the Domain. This list (usually just one entry) comes from the domains you defined for View Composer when you configured vCenter in View Administrator. It controls which domain the linked clones join and which credentials are used.
  • Select the Active Directory container as normal.
  • Choose Use a customization specification (Sysprep) and select the spec you created.
View pool Guest Customization page using a Sysprep customization specification

Finish the wizard and the pool will deploy. Provisioning is a bit slower than with QuickPrep because each linked clone needs an extra reboot.

What Happens When View Customizes with Sysprep

  1. Once the linked clone disks are created, View Manager puts the VM into the Customizing state.
  2. View Manager calls the vCenter API customizeVM_Task to apply the customization specification.
  3. View Manager powers on the linked clone.
  4. Inside the guest, the View Composer Agent sees it’s starting for the first time and calls NetJoinDomain with the machine password cached on the internal disk.
  5. The machine is now joined to the domain.
  6. Sysprep runs inside the guest.
  7. The View Composer Agent waits for Sysprep to finish, then tells the View Agent customization is complete, and the View Agent notifies the View Manager server.
  8. View Manager powers off the clone and snapshots it in its customized state, which becomes the refresh point.
  9. View Manager marks the linked clone Provisioned. When powered on, it moves to Available.

How to Create a PKCS12 (.p12) Certificate for Sophos UTM 9 with OpenSSL

Sophos (formerly Astaro) UTM 9 imports certificates for its Web Application Firewall as PKCS12 (.p12) files. Here’s how to create one with OpenSSL, from private key to import.

Note: run these commands on a separate Linux or Windows machine with OpenSSL installed, not on the firewall itself.

1. Generate a Private Key

Pick an encryption algorithm and key length. Any of these work:

openssl genrsa -des3 -out <private key file name>.key 2048
openssl genrsa -aes128 -out <private key file name>.key 2048
openssl genrsa -aes256 -out <private key file name>.key 2048
openssl genrsa -aes256 -out <private key file name>.key 4096

2. Generate a Certificate Signing Request (CSR)

openssl req -new -key <private key file name>.key -out <csr file name>.csr

Follow your certificate authority’s requirements for the CSR fields. VeriSign, for example, wants no email address, challenge password, or optional company name.

3. Submit the CSR to Your Certificate Authority

If you copy and paste the CSR text, use Notepad or vi, never Microsoft Word, which can alter the formatting.

4. Create the PKCS12 File

openssl pkcs12 -export -in <certificate from your CA>.crt -inkey <private key file name>.key -out <your filename>.p12

If your certificate and key are PEM files instead:

openssl pkcs12 -export -in xxxx.pem -inkey xxxx.pem -out xxx.p12 -passout pass:newpassword -name "newname"

5. Import the PKCS12 File into Sophos UTM

  1. Go to Web Application Firewall → Certificate Management → New Certificate.
  2. Choose Upload, file type PKCS12, select your .p12 file, and save.

6. (Optional) Import the Intermediate CA

If your CA uses an intermediate certificate, go to Web Application Firewall → Certificate Management → Certificate Authority → Import CA and upload the verification CA as a PEM file.

Dell EqualLogic SAN Review: 5 Reasons I Trust It

I’ve used Dell EqualLogic PS Series storage for several years now. I’ve come to trust it completely, and its reliability lets me run a very relaxed shop. Here’s why I recommend it.

  1. Backward compatibility. All EqualLogic arrays work together, old and new.
  2. Easy replication. Setting up replication between arrays is a snap.
  3. Automatic load balancing. Mix and match different drive arrays in a group and the data levels itself out across them. You can’t beat that.
  4. Dual controllers in every array. It’s not cheap, but the redundancy and scalability are outstanding.
  5. Ease of use. The configuration interface is extremely intuitive. Anyone can manage it.

More EqualLogic tips: updating EqualLogic disk firmware with no downtime and installing the EqualLogic MEM on ESXi.

Dell PowerEdge R815 Review: Why It Makes a Great VMware vHost

The Dell PowerEdge R815 is my go-to 2U server for VMware virtualization hosts. Here’s why.

  1. Excellent airflow and serviceability. Between the redundant fans, the power supply layout, and the way the RAM is arranged, the whole chassis is laid out well and easy to work on.
  2. No spinning disks required. I order them with dual SD cards for ESXi and nothing else, and they’re good to go.
  3. Dual power supplies come standard.
  4. Expansion slots for extra network connectivity.
  5. Room to grow. You can order a “half RAM, half processor” configuration and expand later.
  6. AMD Opteron processors that, in my opinion, offer the best performance per watt on the market.

Running into iSCSI latency with the onboard Broadcom NICs? See my Broadcom driver fix for the R815.

SSH Slow to Log In? Fix the Reverse DNS Delay with UseDNS no

Ever SSH’d into a machine and waited far longer than you should for the session to start? It’s especially annoying with servers on your local network, or a VM on a virtual network, that should let you in instantly.

Why SSH Login Is Slow

The SSH server is trying to look up the hostname of the connecting client (a reverse DNS lookup), and that lookup is timing out, for example because the server can’t reach a nameserver or you’re offline.

Two Simple Fixes

Option 1: Turn off the DNS lookup. Add this line to /etc/ssh/sshd_config on the server, then restart sshd:

UseDNS no

Option 2: Add the client’s IP address and hostname to the server’s /etc/hosts file so the lookup resolves immediately.

Linux Hangs Copying Large Files to a WD My Book Live Duo over NFS? Mount with UDP

We ran into trouble copying large amounts of data to a Western Digital My Book Live Duo NAS. The share was NFS-mounted on an Oracle/CentOS 6.5 VM, and as soon as a file over 1 GB was copied, the machine would hang.

The Fix: Use UDP for the NFS Mount

NFS mounts use TCP by default, but for Linux to work reliably with this drive, the mount needs to use UDP:

mount 192.168.1.45:/nfs /transport -o soft,timeo=60,intr,proto=udp

After remounting with proto=udp, large file copies completed without the system halting.

How to Update Dell Force10 S50N Switch Firmware (FTOS) via TFTP

Updating the FTOS firmware on a Dell Force10 S50N switch takes one command and a TFTP server. You can connect over the serial console or SSH.

Firmware download: FTOS-SB-8.4.2.7.bin

Steps

  1. Install a TFTP server on your desktop and copy the firmware file into its folder.
  2. Connect to the switch (serial or SSH) and run the upgrade, pointing at your TFTP server’s IP:
Force10#upgrade system tftp://192.168.1.xxx/FTOS-SB-8.4.2.7.bin
!!!!!!!!!!!!!!!!!!!!!!!!!!!!!!!!!!!!!!!!!!!!!!!!!!!!!!!!!!!!!!!!!!!!!!!!!!!!!!!!!
Erasing Sseries ImageUpgrade Table of Contents, please wait
.................................................................!
17234435 bytes successfully copied
Force10#
  1. Save the configuration with write before you issue reload.

Example Running Config (Two-Unit S50N Stack)

For reference, here’s my running config for a two-switch S50N stack serving VMware hosts and an EqualLogic iSCSI SAN. Repeated interface blocks are trimmed; each port type is shown once.

force10#show running-config
Current Configuration ...
! Version 8.4.2.7
!
redundancy auto-synchronize full
!
hardware watchdog
!
hostname force10phx
!
enable password 7
!
username root password 7 privilege 15
username admin password 7 privilege 15
!
ethernet cfm
!
protocol spanning-tree rstp
no disable
!
stack-unit 0 provision S50N
!
! vHost data ports (0/1-0/6, 1/1-1/6)
interface GigabitEthernet 0/1
description vHost IP 07-01
no ip address
mtu 9252
no shutdown
!
! vHost iSCSI ports (0/7-0/12, 1/7-1/12)
interface GigabitEthernet 0/7
description vHost iSCSI 07-01
no ip address
mtu 9252
switchport
flowcontrol rx on tx on
spanning-tree rstp edge-port
no shutdown
!
! EqualLogic iSCSI ports (0/13-0/20, 1/13-1/20)
interface GigabitEthernet 0/13
description EQL iSCSI Port
no ip address
mtu 9252
switchport
flowcontrol rx on tx on
spanning-tree rstp edge-port
no shutdown
!
interface GigabitEthernet 0/43
description Config Port
no ip address
mtu 1500
switchport
no shutdown
!
interface GigabitEthernet 0/46
description DMZ UpLink 01
no ip address
switchport
no shutdown
!
! Unused ports
interface GigabitEthernet 0/21
no ip address
shutdown
!
stack-unit 1 provision S50N
! (unit 1 mirrors unit 0; DMZ UpLink 02 on 1/46)
!
interface Port-channel 1
description vHost 7 IP
no ip address
mtu 9252
switchport
switchport mode private-vlan trunk
no spanning-tree
channel-member GigabitEthernet 0/1-2
channel-member GigabitEthernet 1/1-2
no shutdown
!
! Port-channel 2 (vHost 8: 0/3-4, 1/3-4) and 3 (vHost 9: 0/5-6, 1/5-6) are identical
!
interface Vlan 28
description PHX Production
name PHX Production
no ip address
tagged Port-channel 1-3
no shutdown
!
interface Vlan 29
description PHX Operations
name PHX Operations
ip address 192.168.29.175/24
tagged Port-channel 1-3
untagged GigabitEthernet 0/22,43
untagged GigabitEthernet 1/22,39,42
no shutdown
!
interface Vlan 30
description PHX Development
name PHX Development
no ip address
tagged Port-channel 1-3
no shutdown
!
interface Vlan 369
description DMZ
name DMZ
no ip address
tagged Port-channel 1-3
untagged GigabitEthernet 0/46
untagged GigabitEthernet 1/41,46
no shutdown
!
interface Vlan 387
description Development
name Development
no ip address
tagged Port-channel 1-3
no shutdown
!
interface Vlan 732
description PHX DB
name PHX DB
no ip address
tagged Port-channel 1-3
no shutdown
!
interface Vlan 999
description iSCSI LAN
name iSCSI LAN
no ip address
mtu 9252
tagged GigabitEthernet 0/7-12
tagged GigabitEthernet 1/7-12
untagged GigabitEthernet 0/13-20
untagged GigabitEthernet 1/13-20
no shutdown
!
ip route 0.0.0.0/0 Vlan 29 192.168.x
!
ip name-server 192.168.x
!
logging history debugging
logging trap debugging
logging source-interface Vlan 29
logging 192.168.x
!
snmp-server community public ro
snmp-server enable traps snmp authentication coldstart linkdown linkup
snmp-server enable traps stp
snmp-server enable traps xstp
snmp-server enable traps envmon fan supply temperature
snmp-server location xxxx
no ip telnet server enable
!
ntp server 192.168.x
!
ip ssh server enable
!
buffer-profile global 4Q
!
line console 0
line vty 0
! ... line vty 1-9
!
end

How to Pre-Provision Switches in a Dell Force10 S-Series Stack

Before you add new switches to an existing Dell Force10 S-Series stack, pre-provision their stack unit numbers so the stack recognizes them and you can configure their ports ahead of time.

1. Provision the New Units on the Existing Stack

SSH to the current stack and, at the config prompt, enter one line per switch you’re adding:

stack-unit 2 provision S50V
stack-unit 3 provision S50V

The number is the unit number of the switch you’re introducing, and S50V is its model. Supported models include S25N, S25P, S25V, S50N, and S50V.

2. Renumber the New Switches

On each new switch, at the enable prompt, renumber it to match the unit number you provisioned:

stack-unit 0 renumber 2
stack-unit 1 renumber 3

3. Save the Configuration

Don’t forget to write out your config:

write memory

Install and Configure Cacti Network Graphing on Red Hat / CentOS

Cacti is an open-source network graphing tool built on RRDtool. It polls routers, switches, and servers over SNMP and turns the results into bandwidth, CPU, and other performance graphs.

This nixCraft guide is the one I use for installing and configuring Cacti on Red Hat and CentOS, step by step:

nixCraft: Install Cacti Monitoring (RRD) Software on Fedora / RHEL / CentOS

Related: installing ntop on CentOS for per-host traffic analysis.